TL;DR: Working examples of setting IPv6 addresses, nameservers and routes (static, SLAAC+RDNSS, SLAAC+stateless DHCPv6, and stateful DHCPv6), with client configuration for ifupdown (/etc/network/interfaces) and netplan, that you can run and experiment with on your own computer with minimal dependencies: github.com/daxtens/ipv6-config-demos
There are quite a few ways you can set up an IPv6 connection with enough information to be useful - an address, nameserver and default route. So far I've come up with 4, listed in the table below. (I found them all very confusing to begin with - the best explanation I've found online so far is this blog post.)
I've been testing netplan - the default network configuration tool in Ubuntu 17.10 onwards - recently, so I wanted to be able to test each of these methods against both backends that netplan supports (systemd-networkd and NetworkManager) and the old-style ifupdown.
This seemed like an ideal use case for LXD/LXC - lightweight, virtual-machine-like containers. What drew me to this over Docker for this use case is that - unlike Docker - LXC containers have been build for the container-as-VM model, rather than the container-as-application-plus-dependencies model. In particular, daemons work as expected with minimal fuss. (If you've never heard of LXD before, a decent intro with a really nice theoretical/historical grounding is this this presentation from Dustin Kirkland.)
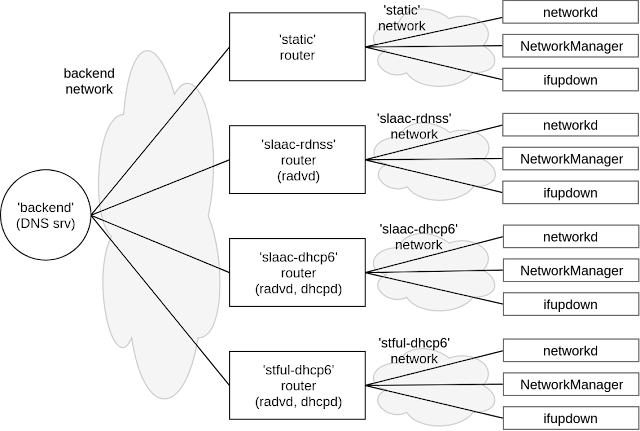
So I have created a script that sets up an set of LXD networks, one for each type of configuration in the table above. On each of those networks, there is a router which that runs the services necessary for each of those models, and 3 clients - netplan + networkd, netplan + NetworkManager and ifupdown. The routers are also each connected to a "backend" network that runs a DNS server, so that I can test that the machines do correct routing and DNS lookups.
That's a lot to take in: here is it in diagram format.
Getting this going was a bit fiddly and threw up some interesting - albeit fairly minor - bugs (LP: #1752211, LP: #1753860). The good news is that with appropriate configuration, they all work out of the box - no patches or recompilation required. I'm also working on making the netplan side of things simpler and better documented - so it will get even easier in the future.
The code and configuration is on GitHub - daxtens/ipv6-config-demos. You can run this entire setup on your local machine. So if you've ever wanted to set up an IPv6 network with Ubuntu but found the many and varied combinations and permutations of radvd and dhcpd confusing, you now have some working samples that you can spin up locally to experiment with and compare.
This setup requires a recent LXD, and may interfere with any existing LXD setup you have, so there's also a script to run it inside a virtual machine created with my favourite VM tool, uvtool. All the gory details of running it is in the README for the repository.
Feel free to use this as a way to explore netplan, IPv6, or LXC/LXD - or to do other cool things! Please do let me know how you go using this, or if you have any questions.
There are quite a few ways you can set up an IPv6 connection with enough information to be useful - an address, nameserver and default route. So far I've come up with 4, listed in the table below. (I found them all very confusing to begin with - the best explanation I've found online so far is this blog post.)
| Method | Address | DNS Nameserver | Default Route |
| Static | Static | Static | Static |
| SLAAC + RDNSS | Autogenerated by client | RDNSS data in RA | From RA |
| SLAAC + Stateless DHCPv6 | Autogenerated by client | DHCPv6 | From RA |
| Stateful DHCPv6 | Assigned by DHCPv6 server | DHCPv6 | From RA |
I've been testing netplan - the default network configuration tool in Ubuntu 17.10 onwards - recently, so I wanted to be able to test each of these methods against both backends that netplan supports (systemd-networkd and NetworkManager) and the old-style ifupdown.
This seemed like an ideal use case for LXD/LXC - lightweight, virtual-machine-like containers. What drew me to this over Docker for this use case is that - unlike Docker - LXC containers have been build for the container-as-VM model, rather than the container-as-application-plus-dependencies model. In particular, daemons work as expected with minimal fuss. (If you've never heard of LXD before, a decent intro with a really nice theoretical/historical grounding is this this presentation from Dustin Kirkland.)
So I have created a script that sets up an set of LXD networks, one for each type of configuration in the table above. On each of those networks, there is a router which that runs the services necessary for each of those models, and 3 clients - netplan + networkd, netplan + NetworkManager and ifupdown. The routers are also each connected to a "backend" network that runs a DNS server, so that I can test that the machines do correct routing and DNS lookups.
That's a lot to take in: here is it in diagram format.

Getting this going was a bit fiddly and threw up some interesting - albeit fairly minor - bugs (LP: #1752211, LP: #1753860). The good news is that with appropriate configuration, they all work out of the box - no patches or recompilation required. I'm also working on making the netplan side of things simpler and better documented - so it will get even easier in the future.
The code and configuration is on GitHub - daxtens/ipv6-config-demos. You can run this entire setup on your local machine. So if you've ever wanted to set up an IPv6 network with Ubuntu but found the many and varied combinations and permutations of radvd and dhcpd confusing, you now have some working samples that you can spin up locally to experiment with and compare.
This setup requires a recent LXD, and may interfere with any existing LXD setup you have, so there's also a script to run it inside a virtual machine created with my favourite VM tool, uvtool. All the gory details of running it is in the README for the repository.
Feel free to use this as a way to explore netplan, IPv6, or LXC/LXD - or to do other cool things! Please do let me know how you go using this, or if you have any questions.
Comments
Post a Comment